Welcome to Day 20 of my month long series “How to Organize Your Kitchen Frugally in 31 Days”. Every day during the month of October I will be sharing an organized space in my kitchen with you. My goal is to inspire you and give you ideas on how you can organize your kitchen.
If you missed it, you may want to read why I’m embracing my outdated kitchen. It might give you a little perspective on why the pictures of my kitchen organization won’t be “magazine worthy”, but helpful for real life organization.
Yesterday I showed you Part 1 of How to Create a Kitchen Command Center. I told you what I got rid of and what I moved to make space for a command center inside of my kitchen cupboard. We also looked at how I quickly organize incoming mail to keep it from piling up.
Today, I’m going to show you what I keep in the rest of my command center.
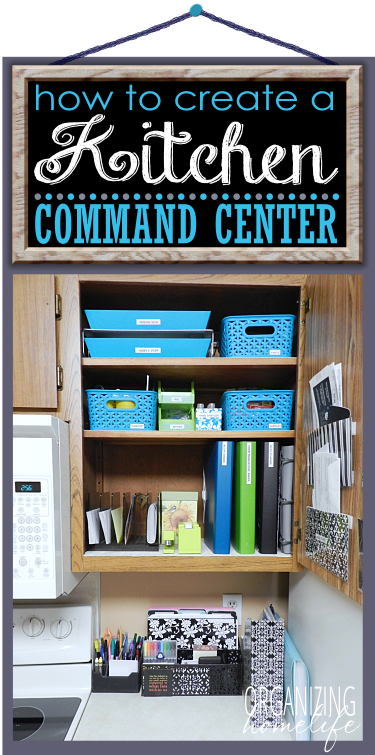
I absolutely love having a central space to keep my schedules, bills, pending paperwork, receipts, etc. so I can access them at a moment’s notice. But I especially love that it’s hidden away inside a cupboard so my kitchen doesn’t look like an office moved in and took over.
When guests unexpectedly drop by, I don’t have to worry about piles of bills or other papers I need to file, stacks of mail, or other miscellaneous junk cluttering up my counters. Is my counter always cleared off and perfect? No! But it takes seconds to put it away with this set up.
So what do I keep in my command center? Let’s start at the top and work our way down.
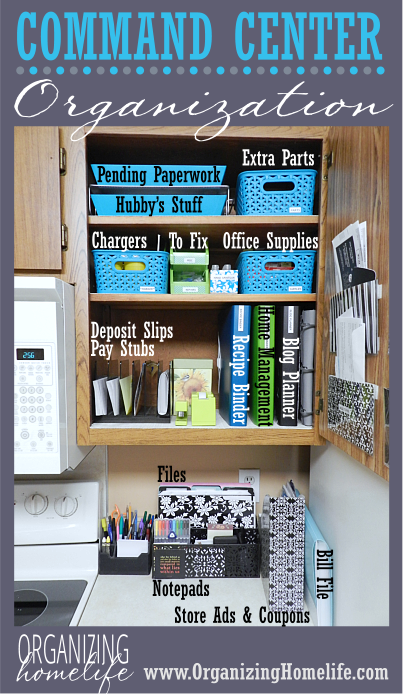
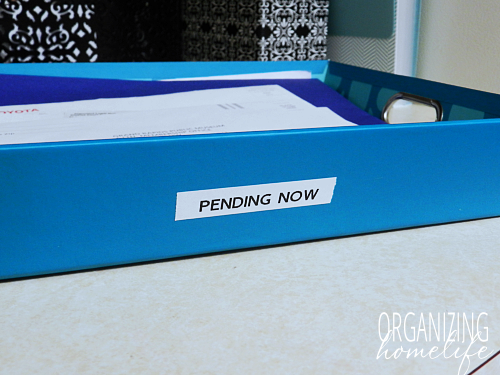
We have a steady stream of “temporary paperwork” coming and going: papers like birthday or wedding invitations, auto recall notices, field trip or youth group permission slips, etc. I needed a place to keep important pending papers that was easily accessible. So I made a “Pending Now” bin using a letter tray I picked up at Target. There is high turnover in that space, but it’s a great place to keep everything that will be happening soon. When I need it, I know just where to look.
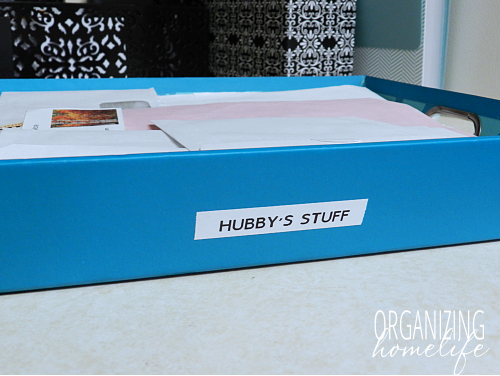
My hubby also seems to have a lot of pending paperwork that I can’t give to him when he’s at work. He also tends to jot notes and to do lists that he likes to keep for when he has time. I got another letter tray and labeled it “Hubby’s Stuff”. Whenever I have something I need to give him, or a place to put his notes that he doesn’t want to lose, I put them in his bin.
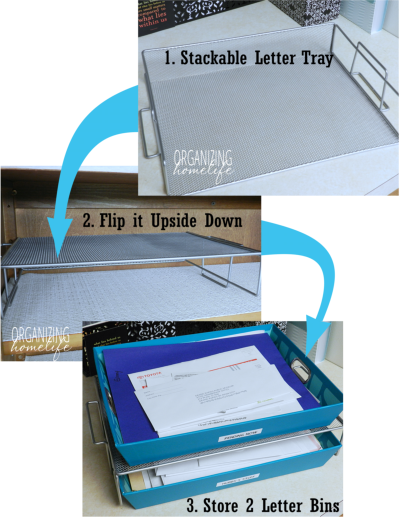
I bought a single, stackable letter tray and turned it upside down to hold our two bins. It works fabulously!
Next to the letter trays I keep a small bin that I also found at Target. I LOVE these plastic basket weave bins! They come in such pretty colors, too!
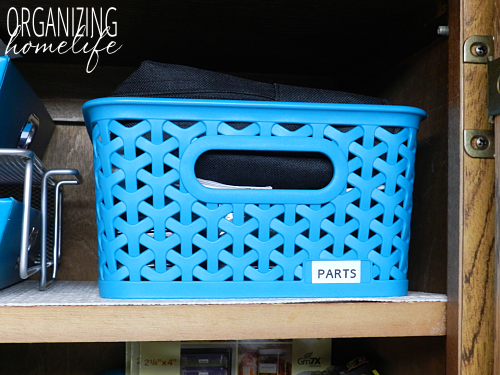
I labeled this bin “Parts”. This is the place I keep miscellaneous parts to things that otherwise wouldn’t have a place to belong. For instance, we have a toy organizing unit in our basement that has the ability to stack one on top of another. Occasionally, I change the set up of the units and need the few extra pieces that we use if we want to separate them. Instead of losing the parts in our garage, I keep a zip top baggie labeled with a permanent marker in the parts bin. It’s out of the way, but still accessible if we need those tiny parts.
I also keep our GPS and charger in a zippered case in the top of this bin. It’s out of the way but easy for my hubby or I to grab if we are going on a trip. I don’t keep it in the car because of the extreme temperatures we have here.
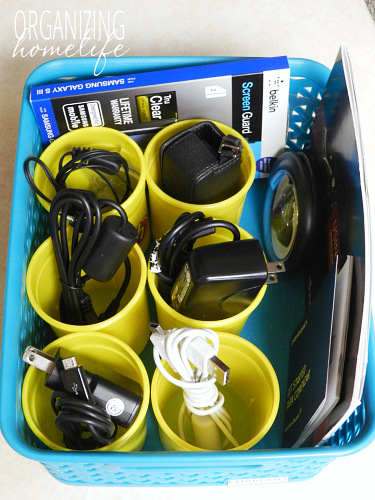
The bin on the left side of the middle shelf is where we keep our charging cords. I repurposed Playdoh containers to store each cord individually. I also keep extra earbuds and additional cell phone screen protectors in this bin.
In the middle of this shelf I have two small stackable bins that I found a while ago in the dollar section at Target. I keep miscellaneous things that need fixing in the “Repairs” bin: things like the watch and the calculator that are waiting for me to buy new batteries and the Polly Pocket that needs her arm glued back on. Instead of piling these types of things on the counters when I’m too busy to attend to them, I put them in their place. When I get a minute, I can easily fix them and return them to where they really belong.
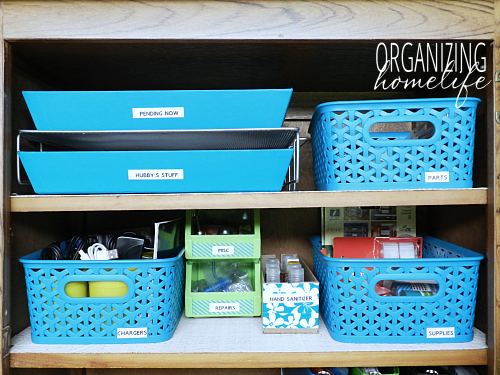
The top stackable bin is truly for junk. Yep. You read that right. You know all that little stuff that appears and you have no idea what it is or where it belongs but know as soon as you throw it away you’ll figure it out? This is where I keep that stuff. After a while I purge anything that we discovered wasn’t really a necessary part to anything.
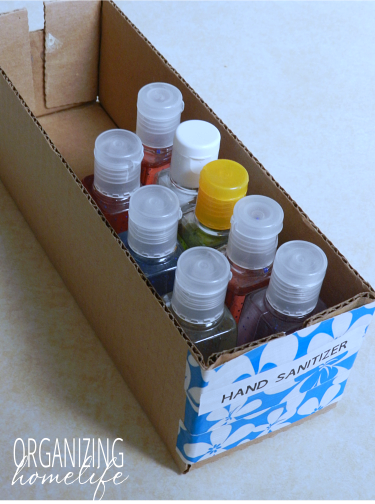
Next to these bins I have a little cardboard box where I keep mini hand sanitizers. I covered the front with a little bit of duct tape to make it look pretty when the cupboard is open. I know it’s a a strange place to keep these, but it’s easy to toss one in my purse when I run out. My kiddos love giving these to me for presents. 🙂
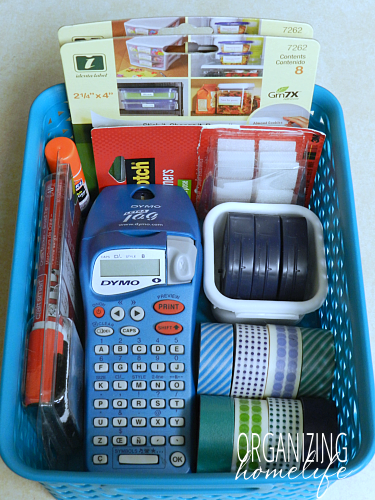
On the right side of the middle shelf I keep a bin of supplies that I use at my command center and in or near my kitchen. Since I’m regularly labeling things, I keep my label maker (here is a newer, similar version), refills, and washi tape here. I also have a space for chalk markers, a glue stick, some velcro fasteners, and some bin labels (since there is always a bin that needs a label 😉 ).
On the bottom shelf I have a letter organizer so I can easily keep paycheck stubs, expense reimbursement stubs, and bank receipts organized. At tax time, I just grab the stack and file them away with our taxes.
I also have a little box where I keep some spare change and gift cards. If we’re going out to eat or going to a specific store, I can easily grab the gift card when we’re running out the door.
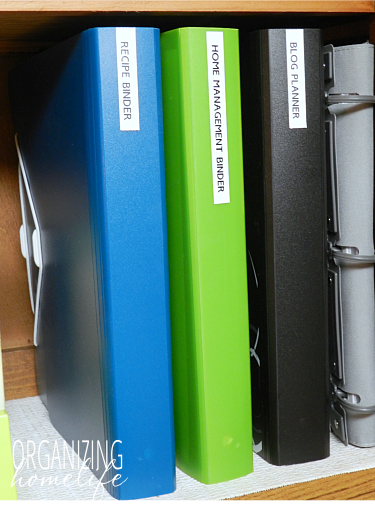
And last, but certainly not least, I keep my Duo binders in my command center. These are by far my favorite organizational binders. They are a combination of a three ring binder on one side and a 7 pocket accordion file on the other side. The elastic straps keep them neatly contained and allow you to open whichever side you want.
I use Duo’s for lots of things, but in my command center I have one for my Recipe Binder, my Home Management Binder, and my Blog Planner. This time of year I put my Vacation Planner in my desk, but during the summer, you would find it here in the command center.
Next to my Duo’s I keep a coupon binder that I got at Target a few years ago. Honestly, I don’t have a lot of time to coupon, but when I do, this is where I keep them.
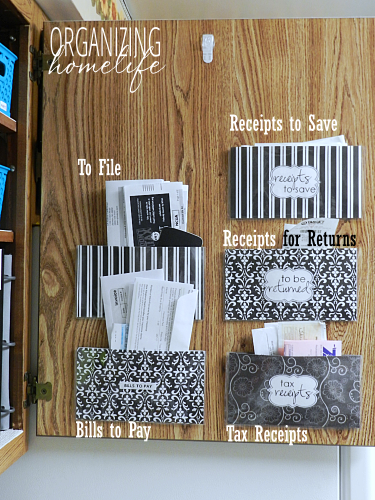
In Part 1 of How to Create a Kitchen Command Center, I showed you the pockets I made with scrapbook paper and stuck to the inside of the cupboard door. See how to make the door pockets here.
I use these pockets to organize bills to be paid, papers/bills to file, and receipts.
Since my husband and I both have jobs that generate lots of tax receipts, I have a pocket where we can easily keep them separated from our other receipts. In the middle, I made a pocket for return receipts. I hate returns, but when you have a large family, they are inevitable (unless you like shopping with your entire family). This is an easy spot for me to put receipts so they don’t get lost in bags until I can make the return.
The top pocket stores the receipts we need to keep for important or expensive purchases. I usually get rid of all unimportant receipts as soon as I get home from the store.
Well, I hope you enjoyed checking out my command center and are inspired to create an organized space of your own. If you cannot come up with a spare cabinet in your kitchen, see if you can implement any of these ideas on a nearby shelf or bookcase.
Tomorrow I’m going to show you my meal planning schedule. Pssst…there’s a printable!



Thank you so much for the motivation. I currently use a Thirty-One hang it up organizer
for the majority of my Command Center. But other things fall through the cracks, and oh paper has always been a monster for me. The instructions for the door pockets are not in either post, if you could share that would be awesome.
I love those Thirty One organizers! I know exactly what you are talking about and have considered getting one myself. 🙂 As far as the door pockets, I’ll be sharing that in a post right after the 31 day series is over.
Genius! Now if I could just figure out a usable cabinet… (:
Love the Washi Tape colors. Can you share where you got them?
Sure thing, Carisa. I found the washi tape at Target. 🙂
I’m a soon to be newlywed and last year my fiance and i moved in together in our first apartment together. It’s been difficult for me adjusting to the responsibilities of running a household but reading your blog every day always inspires me and helps me be the loving and happy lady of the house that i want to be. Thank you for your great ideas.
You bet, Kristina! I’m glad you’re getting some inspiration for your upcoming married life. Best wishes on your wedding. 🙂
Just awesome and inspiring ideas!!! Brilliant , totally get charged after watching and reading your blog. So coollllll..Thumps up. Yay!!!!
Aww, thank you, Jaya! I’m so glad you’re inspired!!!
What great ideas! Genius turning the letter tray upside down to accommodate both trays!
Thanks, Pat! 🙂
The only thing you’re missing, for the non-homeschooling moms, is a section (probably on the door) for box tops and Campbell’s labels. If you want to start a collection and mail them to me I would gladly hand them in at our school. 😉
Ha! Great minds think alike – I used to keep my box tops in my command center. I moved them to my school organizational wall manager. 🙂
Is there a way to post pictures of our completed projects?
Wow! I just found your blog via Facebook and my kitchen organization is under way! You truly have a gift and I’m so glad you are sharing your wonderful ideas. In your command center, are your pockets attached with Velcro squares? I couldn’t tell from the picture, but it looks like they stand out a bit from the door. Thank you again for the inspiration!
Sincerely,
Kristi
Dying for the upcoming post on the scrapbook paper pockets! Have you posted it yet? Thanks….btw I love everything you do!
Thank you so much! You inspired me to make my kitchen command center today. I had a similar area that was located next to our back door (the door we most often use) and it works out perfectly! I love how you show us that organization doesn’t have to cost a fortune…or even a dime for that matter! I was able to make it with everything that I had around the house (which came from the dollar tree, by the way 😉 ). Thanks again, and please keep the great ideas coming!
This is really great. I’m just catching up on your kitchen organizing series. I had never thought to do this in a cupboard. I always see peoples kitchens that have a desk/workspace area to the side of their actual kitchen workspace and am so jealous. This helps me look at my space differently and hopefully I’ll work to organize what I have much more efficiently.
Thanks!
Maybe I missed it but where are those bins from?
Oh my goodness. This 2 part post has made me giddy with excitement! I can’t wait to set this up in our new kitchen (we recently moved). Thank you so much for sharing x
Hi! Have you shown how to make the pockets inside the cabinet yet?? I am desperate to make some! Thanks!!
How did you make your door pocket organizers?
I love this post, and the one before it, and will refer back to them often! I’ll be setting up a new kitchen soon, and today the lightbulb went on with the idea that I can put a command center INSIDE a cupboard. That was my hesitation with putting it in the kitchen, even though it makes the most sense the way the house flows. I look forward to putting together my own command center, borrowing your ideas and tricks!
The one other thing that would be really cool is if there were links in the blog post to purchase said bins, binders, etc…?
Hi – I just wanted to let you know this is the best post about a kitchen command center that I’ve found (and I have read a TON of them). Very pretty and functional, not too big, and containable. Love it 🙂
I’ll echo the questions above about whether you’ve showed how to make the cabinet door pockets yet? I tried searching, but couldn’t find anything. And I agree with Linda – links for where to buy items like some of your items which didn’t mention the store in the description would be fabulous. Happy New Year!
Could you post the measurements of the plastic basket weave bins and where you bought them. Thank you so much
this post more than any other inspired me with ideas to make a place for the stuff that’s all over the fridge- school schedules, chore charts, menu plans. Yay!
You’ve inspired me, Ginny. And I needed it. Thank you!!!
I just came across your blog and love it! You stand out in a sea of blogs by providing a lot of substance, no fluff, ads don’t interrupt the content and excellent picture examples.
I am working my way through your entries (and I think you have woken a beast! Ha). I would love to see what is inside your “Home Managment” binder. Pardon me if you already covered this, I’m still new to your blog.
Also, where do you keep user manuals? I feel like everything comes with one these days and cannot figure out which to keep, which to discard (it’s probably easy to access many online) and the best place to keep them.
Thank you again and keep the inspiration coming! 🙂
This is amazing!! This looks exactly like the “junk area” in my kitchen, only yours looks a million times better when it’s all organized. I am totally inspired by this. Thank you!
Thanks! I have a similar spot where I pile all my receipt/paper stuff and your system set up will really help me organize it!
This is INCREDIBLE! I love how it is so compact and neatly hidden away in the cabinet. I cannot wait to begin putting mine together. I am so happy that I stumbled across your site today while Googling “Poppy Troll”. LOL
I love your website and this idea for a command center. I pinned it back in March and “studied” it until I figured out where mine would go. It took me a few months but I finally finished it. I pinned it and credited your awesome website.